Create order 
You can create job orders to find staff according to the specified requirements.
To create a new order:
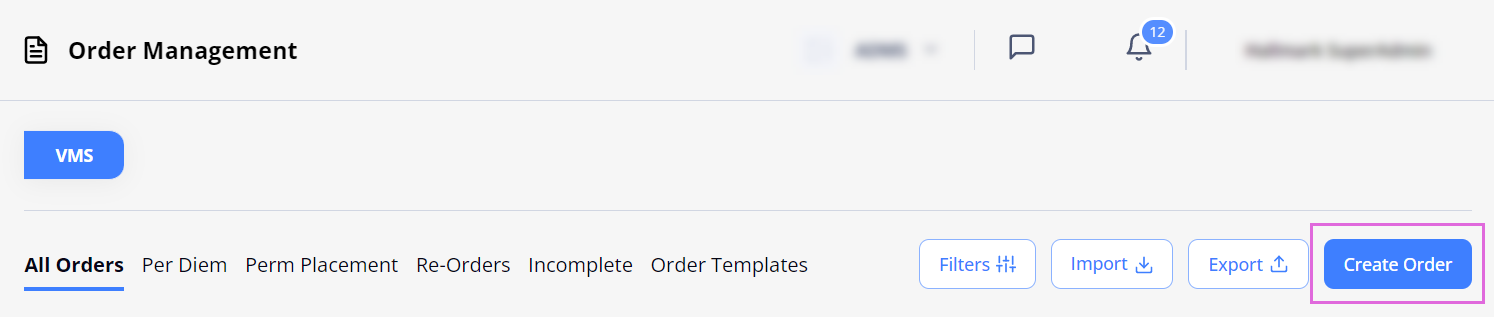
- On Order Management, select Create Order. Hide the imageSee the image.
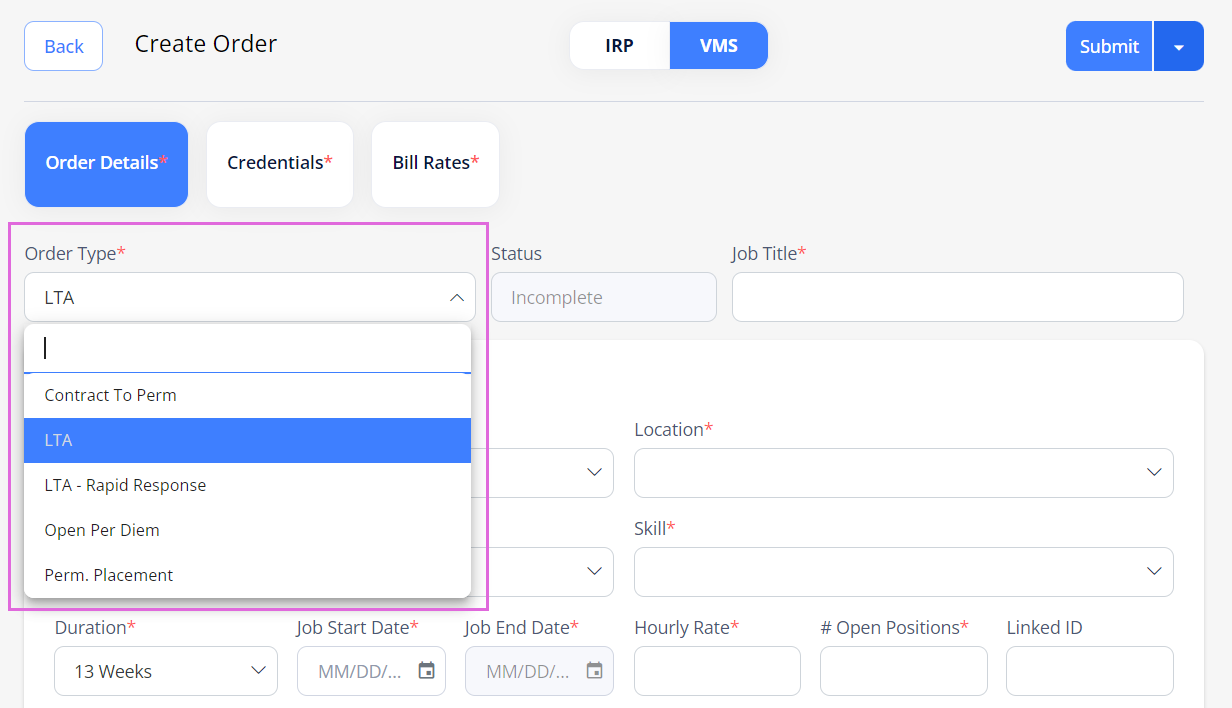
- On Order Details, from the Order Type dropdown list, select the needed option.
Hide the order types' descriptionsSee the order types' descriptions.
Hide the imageSee the image.- There may be restrictions on the types of orders you can create, based on your Organization's configuration.
- Long-Term Assignment (LTA/L): used to hire staff for long-term assignments within the specific region, location, and department.
- LTA - Rapid Response (LR): used to hire staff for long-term assignments within a specific region, location, and department as part of a Rapid Response need for expedited procurement and onboarding.
- Contract To Perm (C): used to hire staff for temporary employment with the possibility of a permanent position offer after the trial period. The order workflow is identical to LTA.
- Open Per Diem (O): used to create a pool of Candidates (who first need to go through the same onboarding process as in LTA orders) to be quickly onboarded to re-orders (one-day shifts.) Candidates are paid by the day in this order type.
- Perm.Placement (P): used to hire staff for long-term, full-time employment. This order type does not have an end date and bill rates, and the salary is measured by the annual amount.
- In the Job Title field, provide your order title.
- Then, fill in all the required (*) fields in the following sections on Order Details:
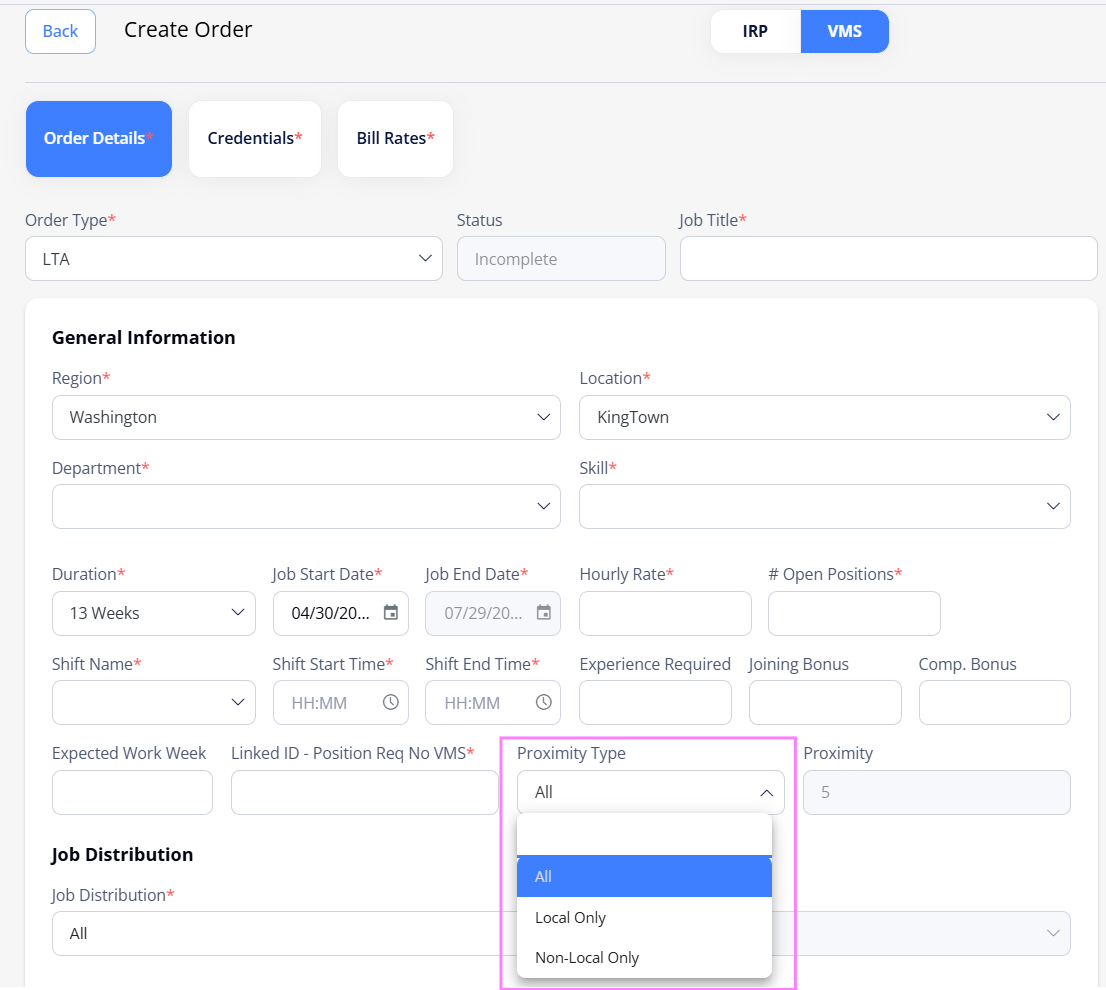
- General Information: provide basic information about the order.
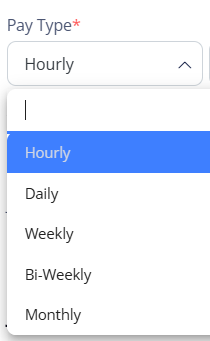
The specified region, location, department, and skill define the workflow to be assigned to the order, as well as the predefined bill rates and credentials.- If the Pay Type field is enabled by the configuration, choose the necessary option: Hourly, Daily, Weekly, Bi-Weekly, or Monthly (see the imagesee the image). Based on the selection, Bill rates will be displayed in the respective rate field (See the imageSee the image).
- Pay Type can be applied only to LTA, LTA - Rapid Response, and Contract to Perm orders.

- If you have the proper permission, here you can also specify the following amounts to be paid to the Candidates:
- Joining Bonus (for starting the assignment with no delay)
- Completion Bonus (for completing the assignment not earlier than the order end date.)
These bonuses are automatically added to the corresponding timesheet > Expenses tab (for details, go to Timesheets.) - If the Proximity Type field is enabled by the configuration, choose the necessary option: All, Local Only, or Non-Local Only. Hide the imageSee the image.
Based on this selection, Candidates with the corresponding proximity to the order's location will be matched to the order. For details, see Local / Non-Local orders.- Proximity Type can be applied only to LTA, LTA - Rapid Response, and Contract to Perm orders, as it affects the bill rates to be used.
- If the Pay Type field is enabled by the configuration, choose the necessary option: Hourly, Daily, Weekly, Bi-Weekly, or Monthly (see the imagesee the image). Based on the selection, Bill rates will be displayed in the respective rate field (See the imageSee the image).
- Job Distribution: specify the way the order should be distributed to the associated Agencies/internal Employees:
- All: immediately distribute the order across all associated Agencies at the same time.
- Tiering logic (available if the "Tiering logic" is configured): distribute the order according to the Tiering logic configured for the selected region, location, and department. After it is distributed to all Agencies in the matching tiers, it is released to all the remaining Agencies. For more details, go to Tier settings.
- Selected: immediately distribute the order to the selected Agencies (chosen from the Agency menu on the right) at the same time.
- Internal (available if your Organization uses IRP): immediately distribute the order across all internal Employees in IRP.
- Tiering logic Internal (available if your Organization uses IRP with the "Tiering logic" configured): distribute the order across the eligible internal Employees according to the internal tiering logic configured in IRP.
For details, see Distribute order to IRP
- Job Description: provide the reason for requisition, details about the Candidates' classification, job requirements, and description.
- Contact Details: provide details about a person from your Organization to contact regarding this order.
- If the contact details are pre-configured, contact details will be automatically filled. If contact details are not pre-configured, the contact details entered in the VMS order will be automatically copied to the IRP order when the order is distributed to IRP.
- Work Location: provide details about the location of the workplace.
- Special Project (optional or required depending on the configuration): specify details about a special project request.
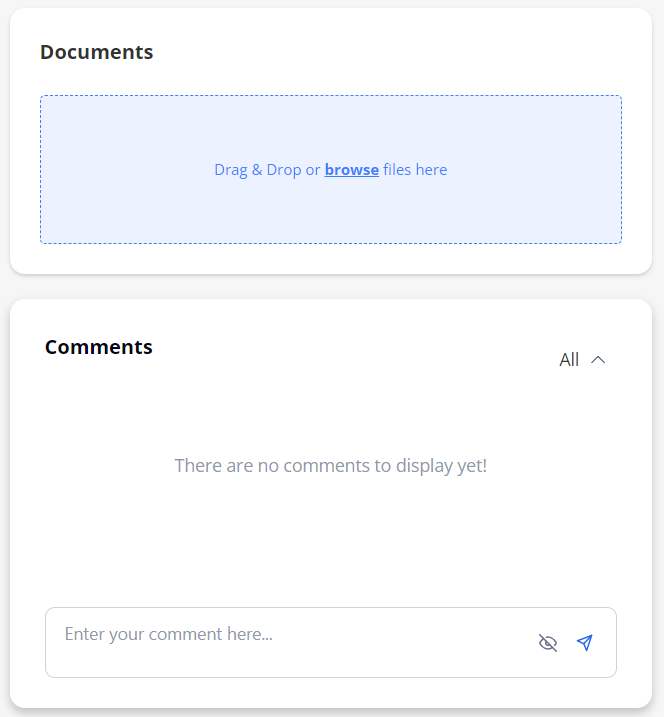
- Documents (optional): upload the needed order-related files (if you have the proper permission).
- Comments (optional): leave the needed order-related comments which can be internal or private. For details, go to Comment on orders.
- General Information: provide basic information about the order.
- Add the supporting documents and comments in the Documents and Comments sections on the right if needed. Hide the imageSee the image.
- On Credentials, view the predefined credentials (if any) that are required for the submission/onboarding of Candidates to this order (based on the selected region(s), location(s), department(s), and skill(s)).
To add more credentials, select + Add Unassigned Credential and choose the available options from the list. You can also clear the prepopulated credentials that you do not need or edit them. Hide the imageSee the image.
Each added credential (predefined or custom) must have one of the following checkboxes selected:
- Req. For Submission: the credential will be required when applying a Candidate to this order.
- Req. For Onboard: the credential will be required when onboarding a Candidate to this order (for the LTA, Contract to Perm, Open Per Diem, and Perm. Placement orders).
- Rapid Response: the credential will be required when onboarding the Candidate to this order (for the LTA - Rapid Response orders only).
- Optional: the credential will not be required when applying or onboarding an Employee to this order.
A Candidate must provide the required credentials to proceed with the order's submission and onboarding (unless the deployment w/o credentials is allowed for the Candidate).
For details about managing and verifying credentials, go to Manage credentials.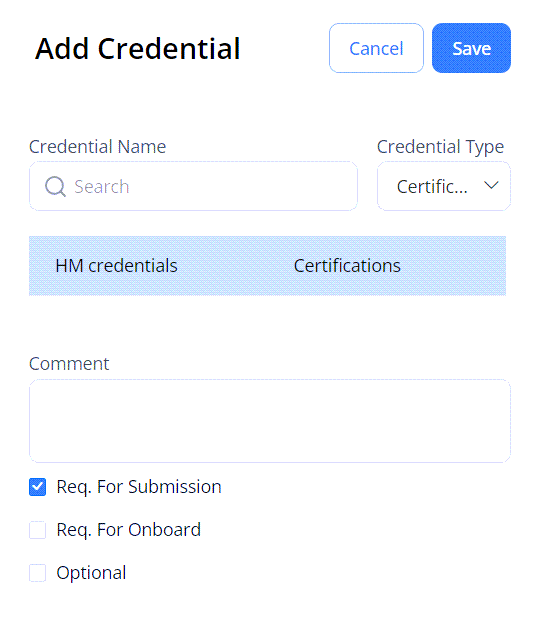
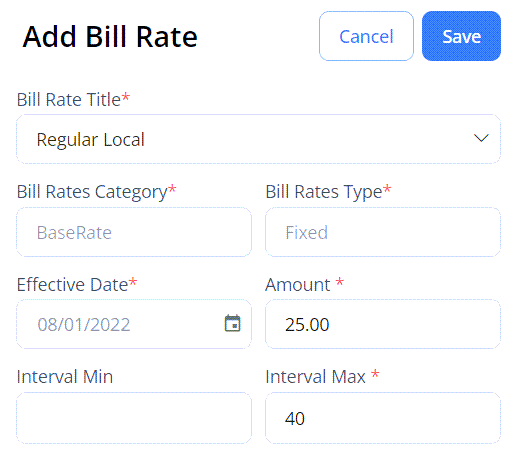
- On Bill Rates, view the bill rates that reflect the current default rate loaded in the system (only for LTA and Contract To Perm order types.) To make changes (if you have proper permission), select the edit icon
 next to the needed bill rate, and/or manually add more bill rates by using + Add Bill Rate on the right (Hide the imageSee the image.) For details, go to Add and edit bill rates.
- You may not create an LTA or Contract To Perm order unless at least one regular bill rate is added to this order.
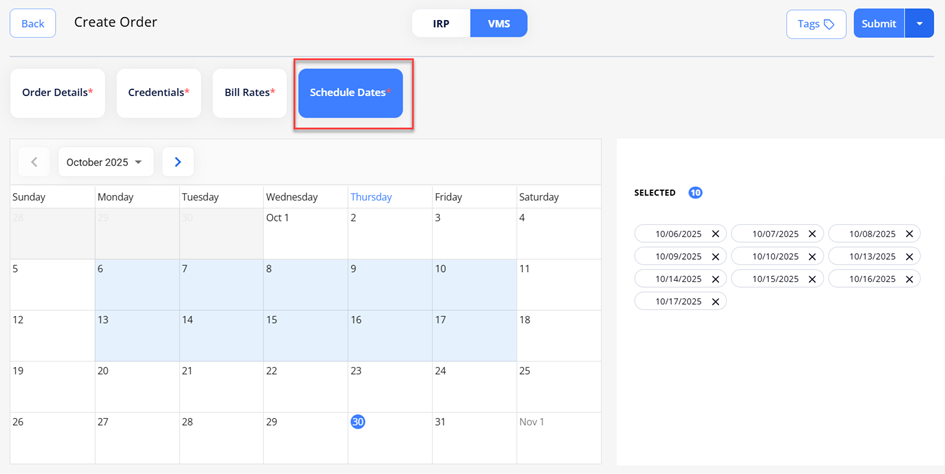
- On Schedule Dates, you can select the required dates on the calendar within the order duration range (See the imageSee the image).
- Schedule Dates tab is available only for LTA, LTA - Rapid Response, and Contract to Perm orders with Locums skill categories.
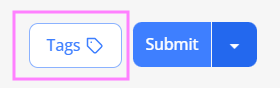
- (Optional) If you have permission, you can use the Tags option to add keywords or labels (Maximum of 50 characters) to an order (See the imageSee the image).
- To filter orders by tags in Order Management, go to Filters > Tags (See the imageSee the image) and select the required tags.

- To filter orders by tags in Order Management, go to Filters > Tags (See the imageSee the image) and select the required tags.
- After you have provided all the required details, you can submit the order by selecting Submit in the upper right.
Then, your order is available in the corresponding grids on Order Management with the Open status or custom status (if configured for your order workflow) and the unique ID assigned to it.
Here you can manage your order and track its progress. For details, go to Order management.
You can still edit all order details until a Candidate is applied and the order moves to the In Progress status. For details, go to Order and Candidate statuses.- Editing the Region, Location, Department, or Skills fields in Open orders may affect the data previously defined for this order. Make sure that the Credentials and Bill Rates data is correct.
- Besides the immediate submission, you can do the following (even before providing all the required details of your order):
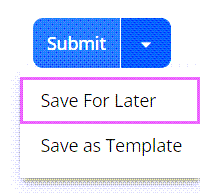
- Save your order as incomplete and finish it later by selecting the arrow next to Submit and choosing Save For Later (Hide the imageSee the image.) You can access your incomplete orders from the Incomplete grid on Order Management.
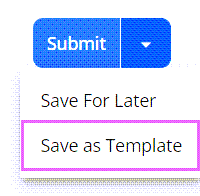
- Save your order as a template (that you can use to quickly create other orders) by selecting the arrow next to Submit and choosing Save as Template (Hide the imageSee the image.) You can access your templates from the Order Templates grid on Order Management. For details, go to Create order from template.
- Save your order as incomplete and finish it later by selecting the arrow next to Submit and choosing Save For Later (Hide the imageSee the image.) You can access your incomplete orders from the Incomplete grid on Order Management.
Create quick order
- You may create quick orders only if you have the proper permission.
To quickly create a new order with only basic required data:
- On Dashboard, select Quick Order in the upper right. Hide the imageSee the image.

- In the opened Quick Order sidebar, fill in the required (*) fields in the corresponding sections and select Submit. Hide the imageSee the image.
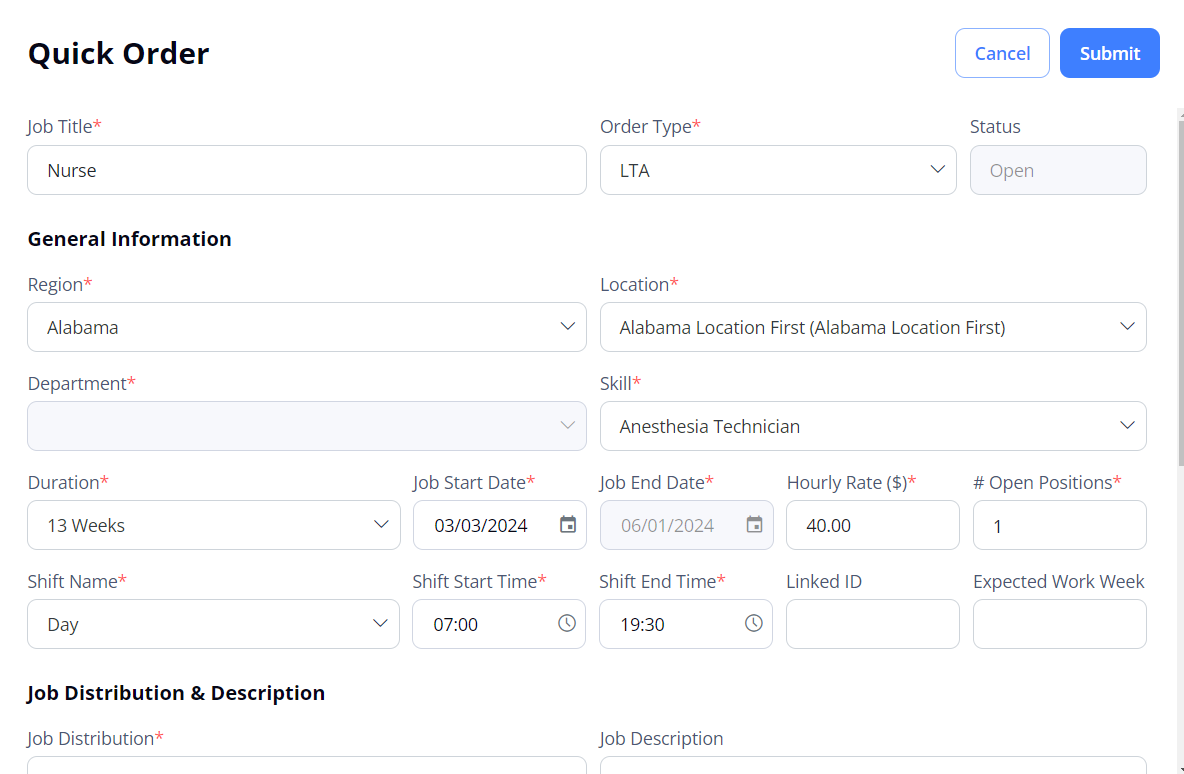
- Credentials and bill rates are automatically prepopulated based on the provided data. You can view and edit them after the order is created.
After submitting the quick order, select its ID link in the notification message that appears to view and manage the created order on Order Management.
- Next step: Offer position to Candidate.
Watch video
See also